
CYBORG RUMBLE - Game controller SAITEK - Free user manual and instructions
Find the device manual for free CYBORG RUMBLE SAITEK in PDF.


| Product Type | Joystick with Force Feedback and Touchsense technology |
| Brand | SAITEK |
| Model | CYBORG RUMBLE (Cyborg 3D Rumble Force) |
| Dimensions (estimated) | 25 x 25 x 30 cm (base and stick) |
| Weight (estimated) | 1 kg |
| Power supply | USB port (bus-powered) |
| Connection | USB, Plug-and-Play |
| Feedback technology | Force Feedback and Touchsense (Immersion) |
| Number of buttons | 8 fully programmable buttons + rapid fire trigger |
| Throttle | Ambidextrous (for left and right-handed users) |
| Hat button | 8 directions (peripheral vision, weapon selection) |
| 3D rudder | Twist function for flight simulation |
| Included software | Saitek Smart Technology (SST) - drivers and profile editor |
| Compatibility | Windows with Microsoft DirectX 7.0a or higher |
| Maintenance and cleaning | Clean with a dry cloth; avoid moisture and liquids |
| Safety | Complies with current safety standards; do not open or modify |
| Services and support | Technical support at www.saitek.com; downloadable game profiles |
Frequently Asked Questions - CYBORG RUMBLE SAITEK
User questions about CYBORG RUMBLE SAITEK
0 question about this device. Answer the ones you know or ask your own.
Ask a new question about this device
Download the instructions for your Game controller in PDF format for free! Find your manual CYBORG RUMBLE - SAITEK and take your electronic device back in hand. On this page are published all the documents necessary for the use of your device. CYBORG RUMBLE by SAITEK.
USER MANUAL CYBORG RUMBLE SAITEK
The Saitek Cyborg 3D Rumble Force Stick is the ultimate controller for the discerning gamer. This awesome joystick comes complete with sublime new looks and Immersion's® patented Touchsense™ technology to take the gaming experience to a new level of interactivity.
The haptic technology inside dramatically improves gamers' performance and power - by unlocking their sense of touch and allowing them to feel what they see and do on the computer screen. The Rumble ForceTechnology is combined with a full range of features to put you in total control of the game.
Main Control Features
- Rapid Fire Trigger - with instant response when you most need it
8 fully programmable fire buttons for personalized controller settings - Dual handle throttle for left- or right-handed gaming
- 8-way point-of-view hat switch for peripheral vision in 3D games or changing weapons
3D Rudder Twist on handle for increased realism in flight sim games
Simple 'plug-and-play' USB connection
GETTING STARTED
Saitek Smart Technology Software
Saitek Smart Technology software is the software that Saitek supplies for our high-end game controllers. The Smart Technology software comprises the product drivers for these Saitek controllers and the optional programming software. By keeping the two separate, the Smart Technology software offers two types of installation to suit the individual gamer's needs, which means even more gamers can enjoy these quality Saitek products.
The Quick Install loads the product drivers only (all that is needed to use the controller) and is suitable for the new or Typical User. This install is fast and simple and will have the gamer up and running in no time at all.
The Full Install loads the product drivers and the Saitek Smart Technology programming software and is suitable for the Advanced User. The programming software delivers a powerful set of features for the ultimate configuration in the game. Although it is recommended for the seasoned gamer, it can be installed at any time. This gives the typical user a chance to get to know the controller before taking gaming to the next level.
Installation for Users of Windows® XP
Quick Install (Drivers Only)
This installation will ONLY install the drivers for your Saitek controller. The Full Install (below), will install the drivers and the Saitek Smart Technology programming software for your Saitek controller.
Note: Please do not connect your Saitek controller until asked to by the installation procedure.
1 With your computer switched on, close down any programs that are currently running and insert the Saitek Smart Technology CD into your CD-ROM drive.
2 When the Welcome screen appears, click Next to continue. (If the CD does not run automatically, select Start from the Windows® Taskbar, then Run and type D:\Install.exe and click OK - where D:\ is letter of your CD-ROM drive).
3 After reading the Disclaimer, select the I accept the terms of the Disclaimer option and click Next to continue.
4 At the Device Driver Installation screen, click on Next and follow the on-screen instructions.
5 When prompted, plug your controller's USB connector into your computer, then click on Configure and then Continue Anyway. Follow the on-screen instructions until you reach the Controller Properties screen.
6 When the Controller Properties screen appears, click Next to view the Test screen.
7 Now try out all your controller's buttons and controls to show that it is working properly. When you have finished, click OK.
8 At the Programming Software screen, select Typical User and click Next.
9 At the Registration screen, select Register my Saitek controller online and follow the on-screen instructions or select Register Later and click Next.
10 Click on Finish to complete the installation. Your Saitek controller is now ready for use with your favorite games.
Full Install (Drivers and Programming Software)
This installation will install the drivers and the Saitek Smart Technology programming software for the Saitek controller.
1 Follow points 1 - 7 of the install procedure in Quick Install (Drivers Only), then at the Programming Software screen, select Advanced User and click Next.
2 At the Programmable Controller Drivers screen, click Update and follow the on-screen instructions. At this point you will be asked to install such features as the Saitek Magic Mouse and Saitek Magic Keyboard (these are what XP calls the various elements of your Saitek controller). Continue to click on Next, Continue Anyway and Finish to accept the installation until the Installation of programming software successful screen appears.
3 At the Installation of programming software successful screen, click Next.
4 At the Registration screen, select Register and follow the on-screen instructions or select Register Later and click Next.
5 Upon completion of the installation, you have the option to Run Profile Editor, which will give you a view of the 3-D programming environment. If you do not wish to see the Profile Editor at this point, just click on Finish to complete the installation. Your Saitek controller is now ready for use with your favorite games.
For a complete guide on how to program your Saitek controller, visit the Saitek website at www.saitek.com.
Installation for Users of Windows® 2000
Quick Install (Drivers Only)
This installation will ONLY install the drivers for your Saitek controller. The Full Install (below), will install the drivers and the Saitek Smart Technology programming software for your Saitek controller.
Note: Please do not connect your Saitek controller until asked to by the installation procedure.
1 With your computer switched on, close down any programs that are currently running and insert the Saitek Smart Technology CD into your CD-ROM drive.
2 When the Welcome screen appears, click Next to continue. (If the CD does not run automatically, select Start from the Windows® Taskbar, then Run and type D:\Install.exe and click OK - where D:\ is letter of your CD-ROM drive).
3 After reading the Disclaimer, select the I accept the terms of the Disclaimer option and click Next to continue.
4 At the Device Driver Installation screen, click on Next and follow the on-screen instructions.
5 When prompted, plug your controller's USB connector into your computer, then click on Configure.
6 When the Controller Properties screen appears, click Next to view the Test screen.
7 Now try out all your controller's buttons and controls to show that it is working properly. When you have finished, click OK.
8 At the Programming Software screen, select Typical User and click Next.
9 At the Registration screen, select Register and follow the on-screen instructions or select Register Later and click Next.
10 Click on Finish to complete the installation. Your Saitek controller is now ready for use with your favorite games.
Full Install (Drivers and Programming Software)
This installation will install the drivers and the Saitek Smart Technology programming software for the Saitek controller.
1 Follow points 1 - 7 of the install procedure in Quick Install (Drivers Only), then at the Programming Software screen, select Advanced User and click Next.
2 At the Programmable Controller Drivers screen, click Update and follow the on-screen instructions.
3 Then at the Installation of programming software successful screen, click Next.
4 At the Registration screen, select Register and follow the on-screen instructions or select Register Later and click Next.
5 Upon completion of the installation, you have the option to Run Profile Editor, which will give you a view of the 3-D programming environment. If you do not wish to see the Profile Editor at this point, just click on Finish to complete the installation. Your Saitek controller is now ready for use with your favorite games.
For a complete guide on how to program your Saitek controller, visit the Saitek website at www.saitek.com.
Installation for Users of Windows® 98 and Me
Quick Install (Drivers Only)
This installation will install the drivers for the Saitek controller only.
Note: Please do not connect your controller until asked to by the installation procedure.
1 With your computer switched on, close down any programs that are currently running and insert the Saitek Smart Technology CD into your CD-ROM drive.
2 When the Welcome screen appears, click Next to continue. (If the CD does not run automatically, select Start from the Windows® Taskbar, then Run and type D:\Setup.exe and click OK).
3 After reading and accepting the Disclaimer, click Next to continue.
Note: For your controller to work, you must have a minimum of Microsoft® DirectX® 7.0a installed on your computer. The installer will automatically recognize if this software needs to be added, and will allow you to install it directly from the Saitek Product Companion CD, if necessary.
If you are asked to install Microsoft® DirectX® 7.0a, click Install and follow the on-screen instructions, and then restart your computer when prompted. Make sure that you leave the Saitek CD in the drive when restarting. After this software has been installed, you will automatically be taken to the installation to continue with the next step.
4 At the Device Driver Installation screen, click on Next and follow the on-screen instructions.
5 When prompted, plug your controller's USB connector into your computer.
6 When the Controller Properties screen appears, click Next to view the Test Screen.
7 Now try out all your controller buttons and controls to show that it is working properly. When you have finished, click OK.
8 At the Programming Software screen, select Typical User and click Next.
9 At the Registration screen, select Register and follow the on-screen instructions or select Register Later and click Next.
10 Click on Finish to complete the installation. Your Saitek controller is now ready for use with your favorite games.
Full Install (Drivers and Programming Software)
This installation will install the drivers and the Saitek Smart Technology programming software for the Saitek controller.
1 Follow points 1 - 7 of the install procedure in Quick Install (Drivers Only), then at the Programming Software screen, select Advanced User and click Next.
2 Follow the on-screen instructions and select Yes, I want to restart my computer now when prompted.
3 When Windows® has restarted, the Registration screen will appear, select Register and follow the on-screen instructions or select Register Later and click Next.
4 Click on Finish to complete the installation. Your Saitek controller is now ready for use with your favorite games. To access the programming software click on the Saitek Smart Technology icon that the installation left on your Desktop.
5 For a complete guide on how to program your Saitek controller, visit the Saitek website at www.saitek.com.
Installing the Programming Software at a Later Date
If you chose the Quick Install (Drivers Only) you might want to install the Saitek Smart Technology programming software once you have mastered your new Saitek controller. To do this, simply reinstall your controller following the Full Install (Drivers and Programming Software) above.
PROGRAMMING YOUR SAITEK CYBORG 3D RUMBLE FORCE WITH SAITEK SMART TECHNOLOGY PROGRAMMING SOFTWARE
Introducing Saitek Smart Technology Programming Software
Saitek Smart Technology Programming Software (SST) is the software Saitek supplies to configure your Saitek controller for enhanced functionality. SST delivers a powerful set of features, allowing you to program your device with the ultimate configuration for total interaction. Despite a level of sophistication previously unseen in the market, and because of the Saitek Smart Technology inside, the software remains simple and intuitive to use.
Features of Smart Technology Programming Software:
- Quick and easy setup in any game
- Personalize the controller settings for your favorite games
- Configure your controller with an on-screen 3D model and interface
- Multiple setup option for each controller - ideal if a controller is used by several people
- Program special moves with sophisticated timing features
- Special game setups available as 'Profiles' from the Saitek website and on the Smart Technology CD
Download the latest version of Saitek Smart Technology software from the Saitek website
What is a Profile?
A Profile is a custom setup for improved gameplay – consisting of a set of commands that are pre-assigned to the buttons or axes of your controller. There are over two hundred pre-written Profiles available on the Product Companion Disk that accompanies this device or on the Saitek Website – www.saitek.com. (Please check the website for new or improved Profiles, which are being added regularly).
How Do I Program My Controller?
After getting to know your controller, you can start creating your own personal Profiles with the Saitek Smart Technology programming software (SST). This software has virtually unlimited programming capabilities and allows you to customize the controller to your exact gaming needs.
The Profile Editor allows you to program the buttons on your joystick to perform different actions within your games – this is especially useful if the game you are using does not have its own screen that allows reconfiguring of your buttons.
Getting Started
1 Right-click on the controller icon in the taskbar next to your clock.
2 From the pop-up menu click Profile Editor.
3 In the profile editor select the button you want to assign a keyboard command to. You do this by right-clicking on the button from the list on the right of the screen.
4 From the drop-down menu click New Key Presses.
5 You will then have a small window called the Keypress Editor with a flashing cursor in it. Simply press the key(s) on the keyboard you wish to assign to your controllers button and then click OK.
6 Repeat this procedure for all the buttons you wish to program and then click File, Save at the top of the Profile Editor window.
7 Name the profile as you wish (usually it is recommended to call it the name of the game that the profile is intended for) and then click Save.
8 To enable the profile either click the Profile Now icon at the top of the Profile Editor (it looks like a black and yellow crosshair) or right-click on the controller icon in your taskbar and select the name of the profile from the pop-up list of options.
9 You will notice that when a profile is loaded that the controller icon in your taskbar has a green square behind it, indicating that a profile is currently loaded. If you wish to unload a profile simply right-click on the controller icon and click Clear Profile from the pop-up list of options.
10 For a complete guide on how to program your Saitek controller, visit the Saitek website at www.saitek.com.
TROUBLESHOOTING
Q My computer is not recognizing the Cyborg 3D Rumble Force - what's wrong?
A Check the cable connections. Turn off the computer and then unplug your controller. Plug it back in making certain that is securely attached.
Q Can I have another game controller connected to my PC at the same time?
A To avoid potential problems and conflicts, we recommend that you remove any existing game controllers before installing the Cyborg 3D Rumble Force. Do this by selecting the previously installed controller in the Game Controllers window and clicking on Remove.
Q I have plugged in my Cyborg 3D Rumble Force using the USB connector and it has not been recognized by the computer.
A Your USB connection may not be enabled within the computer. You can switch it on via your computer's BIOS settings (please check the documentation that came with your computer). If you are still unsure as to what to do, contact Technical Support.
TECHNICAL SUPPORT
Can't get started - don't worry, we're here to help you!
Did you know that nearly all the products that are returned to us as faulty are not faulty at all - they have just not been installed properly?
So, if you experience any difficulty with this product, please visit our website or contact one of our friendly technical support staff who will be pleased to help you.
Our website www.saitek.com is designed to help you get the best performance from your Saitek product. And if you still have problems, we also have teams of product specialists around the world you can call for advice and support. Contact details are provided on the Technical Support Center list provided with this product. Saitek is dedicated to helping you enjoy your purchase - please call us if you have any difficulties or worries.
The Saitek Website
If you have access to an Internet connection, many of your technical queries may be answered with a simple visit to the Saitek Website at:
www.saitek.com
The technical support area will provide you with all the information you need to get the most out of your controller, solve any problems you might have and provide you with the latest game configurations.
The site also contains regularly updated material, including information about:
Current and forthcoming products
- Driver upgrades
Game configurations (Profiles)
- Links to useful sites
Contacting Saitek
If you do not have access to the Internet, or if the website cannot answer your question, you will need to contact your local Saitek Technical Support Team.
However, before contacting Technical Support, here are a few tips to help us to help you:
Make sure you have followed all the steps shown in this manual
- Check that the controller is correctly connected to your computer
- Confirm that your PC is functioning normally
At Saitek, we aim to offer comprehensive and thorough technical support to all of our users. So, before you call, follow the guidelines below to ensure that you have all of the information necessary for us to help you.
1 Know the problem - make sure that you are clear about the problem you are having and that you can describe the events that led up to it.
2 Check the Troubleshooting guide –in the Troubleshooting section of this manual.
3 Know your hardware - if it is possible, have the following information to hand:
The make and model of the computer you are using
The name and version of the game you were using when you started having problems
- The make and model of your computer's motherboard
The make and model of your computer's sound card
4 Be ready - if possible, please try and ring whilst sitting at the computer with all the relevant information and hardware to hand. If you are having a problem with a particular game or application, make sure that you have it loaded.
5 Be patient - we try our best to deal with customer queries as quickly as possible. At times it may be necessary to refer queries on to our specialist staff. Please be patient!
To contact your local Saitek Technical Support Center, please look up the relevant contact details on the separate Technical Support Centre sheet that came packaged with this product.
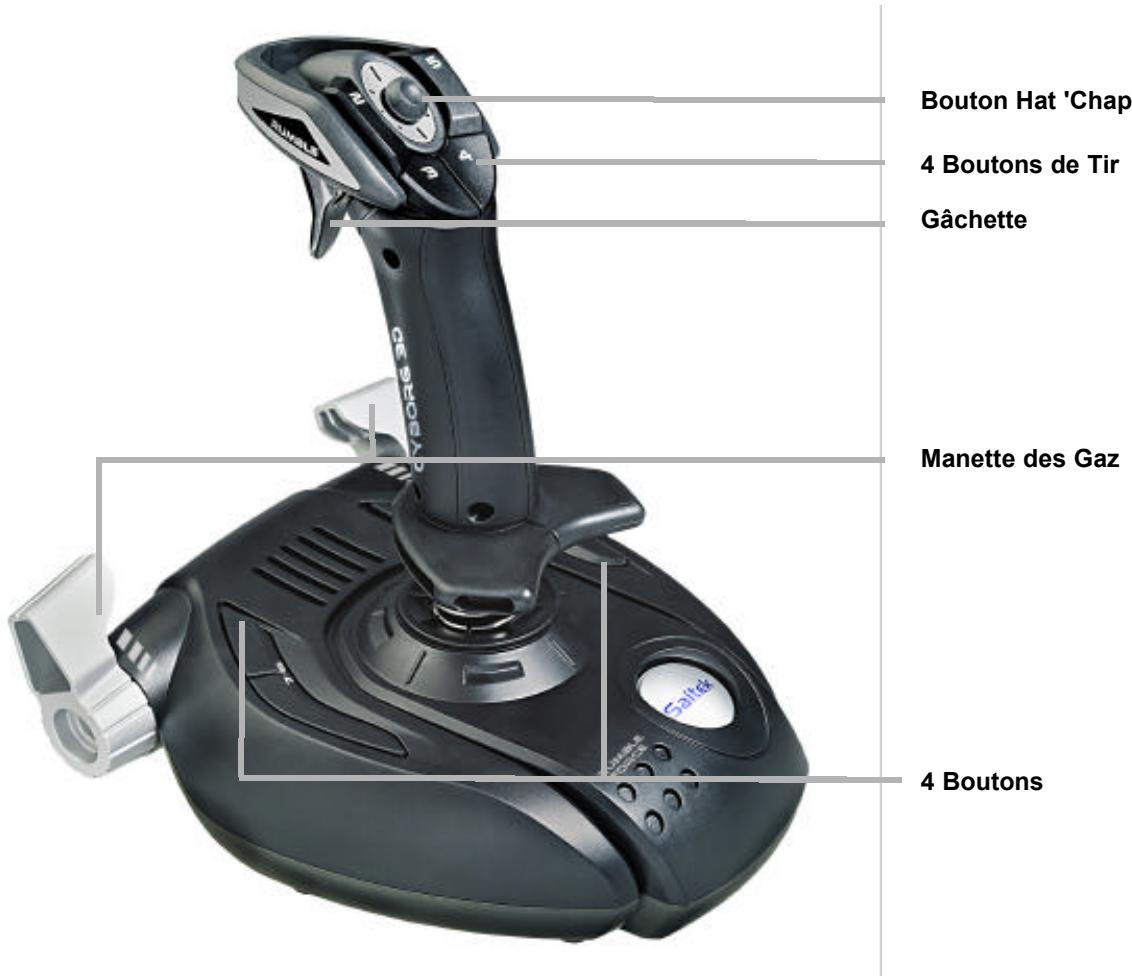
SAITEK CYBORG 3D RUMBLE FORCE STICK
Main Control Features
Main Control Features
Main Control Features
Main Control Features
Force Feedback Powered by Immersion® TouchSense™ Technology
"Protected by one or more of the following United States Patents:
4,823,634; 5,185,561; 5,220,260; 5,389,865; 5,414,337; 5,459,382; 5,559,412;
5,576,727; 5,589,854; 5,629,594; 5,666,138; 5,691,898; 5,701,140; 5,721,566; 5,731,804;
5,734,373; 5,739,811; 5,754,023; 5,767,839; 5,769,640; 5,805,140; 5,825,308; 5,831,408;
5,844,392; 5,872,438; 5,889,670; 5,889,672; 5,907,487; 5,929,607; 5,929,846; 5,956,484;
5,959,613; 5,999,168
©2002 Saitek Ltd. Made and printed in China.
All trademarks are the property of threir respective owners.
PS18R
J59
SD2.5
P/N
- Main Control Features
- GETTING STARTED
- Saitek Smart Technology Software
- Installation for Users of Windows® XP
- Quick Install (Drivers Only)
- Full Install (Drivers and Programming Software)
- Installation for Users of Windows® 2000
- Installation for Users of Windows® 98 and Me
- Installing the Programming Software at a Later Date
- PROGRAMMING YOUR SAITEK CYBORG 3D RUMBLE FORCE WITH SAITEK SMART TECHNOLOGY PROGRAMMING SOFTWARE
- Introducing Saitek Smart Technology Programming Software
- Features of Smart Technology Programming Software:
- What is a Profile?
- How Do I Program My Controller?
- TROUBLESHOOTING
- TECHNICAL SUPPORT
- Can't get started - don't worry, we're here to help you!
- The Saitek Website
- www.saitek.com
- Contacting Saitek
- SAITEK CYBORG 3D RUMBLE FORCE STICK
Brand : SAITEK
Model : CYBORG RUMBLE
Category : Game controller